Container Water 03: 2D Surface Sim
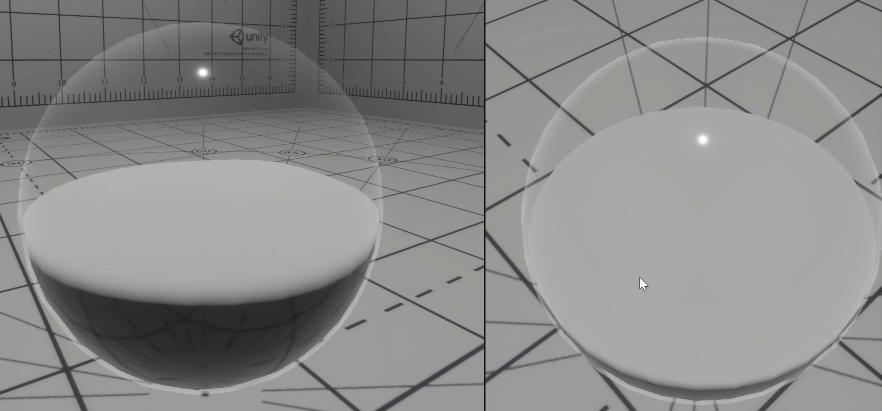
With the water constrained into the bowl, I’ll now move onto the surface simulation. Here I wanted something more than sine waves for the surface of my water sim, mainly because our fish inside the bowl ideally want to interact with the water’s surface.
Damoiseaux described in his breakdown how he had used a spring system to simulate physics for the surface of his water, it’s something I’d never done before, but had been assured by the code lead at the time it was straight forward enough an algorithm.
I’d a little experience with compute shaders from the beginning of this year (thanks to this wizard, arsiliath) and learnt how to read from and write to buffers in the name of progressively iterating on simulations.
So that’s what I did, my own take on a Mass Spring System. I had found an implementation of this in Unity at the time, but didn’t end up referring to the code too often. That being said it’s a great example, especially if you want a play with it to get an idea of what it’s all about. I’ll go into it in a little more detail later, but I’m not able to post complete source code.
A Mass Spring System (or Model), is a simulation of a grid of springs which are behave as if they are interconnected. It normally has a number of different parameters to tweak the feel of the sim, but it’s a straight forward algorithm which can feel very fluid with minimal effort. Worth noting however, it does not account for pressure or flow, components often used in fluid simulation.
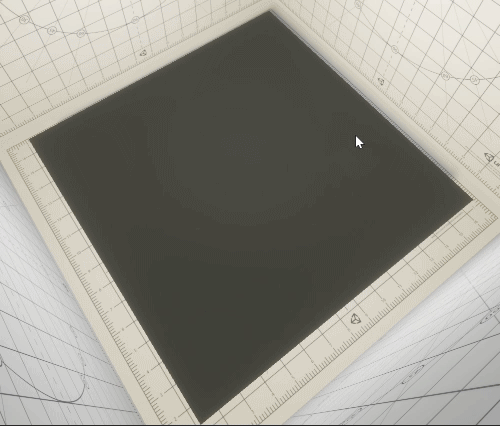
For my implementation, I had compute buffers (StructuredBuffers in HLSL) of spring positions and velocities sent to my compute shader, each 256 long entries long. This meant I could make a 16×16 grid of springs, and as I’m only moving each spring on the y axis, it keeps things very simple.

This version is the same as the the featured image, a 16×16 pixel heightmap image, where each pixel is a the normalised spring height. Here however I’ve changed the texture sampler to use bilinear filtering. This smooths out the water’s surface for more or less for no added cost, and so far doesn’t seem to yield and un-wanted issues.
Compute Shaders
A quick note on compute shaders for those who’ve not really been introduced. Despite being written in HLSL like “regular” shaders, the purpose of compute shaders can be really quite different, and in many ways not as immediately obvious.
A “conventional” shader is composed of a number of programs (vertex, geometry, pixel), but ultimately its job in the graphics pipeline is to output a pixel colour to a buffer or the screen. Geometry in, pixels out, simple.
Compute shaders however are used for computing things, it’s a general as that, they aren’t specifically for rendering. Take Unity’s new HDRP, a large chunk of the compute in this render pipeline has been implemented via compute shaders. The GPU’s parallel processing power makes it an ideal candidate to work on complex problems, assuming your problem can be solved in parallel.
By this I mean, you don’t need to know what every other thread in your compute shader is doing for you to compute your current thread, they all have to execute in isolation from each other. This is still a part of compute shaders I’m getting my head around, but as long as you can structure your problem correctly, it’s a fast way to process it.
So in my case, each spring in the simulation will solve in it’s own thread, and it’ll use the last frame’s data for it’s neighbouring springs.
With this simulation, I’m calling two kernels (or programs) from my C# script – this isn’t all of it, just a snippet.
// Spring Velocity Kernel
_cs.SetBuffer(_velKernel,
              "springPositionsArray",
              _springHeightBuffer);

_cs.SetBuffer(_velKernel,
              "spring1DVelocityArray",
              _spring1DVelocityBuffer);

_cs.Dispatch(_velKernel, 1, 1, 1);
In the first, we update each spring’s velocity, based on its neighbouring spring’s position. The two SetBuffer calls are setting the position and velocity data in the Velocity Kernel. This Kernel is then dispatched for execution on the GPU when it next has the bandwidth that frame.
// Spring Position Kernel
_cs.SetBuffer(_posKernel,
              "springPositionsArray",
              _springHeightBuffer);

_cs.SetBuffer(_posKernel,
              "spring1DVelocityArray",
              _spring1DVelocityBuffer);

_cs.SetTexture(_posKernel,
               "springOutTex",
               _springOutTex);

_cs.Dispatch(_posKernel, 1, 1, 1);
In the second Position Kernel, we take this velocity and apply it alongside external forces to get the spring’s updated position. Here we’re setting again our buffers (we need to set the buffers for each kernel, other uniforms can get set for the whole compute shader).
This updated position is written back out to its original buffer and it’s also written to a render texture which is passed to our surface shader.
Position and Velocity Kernels
I’m not going to spend too much time here, but I’ll cover the general algorithm. Below is the Velocity Kernel, it’s small enough to just past here.
[numthreads(SPRING_COUNT, SPRING_COUNT, 1)]
void VelKernel(uint3 id : SV_DispatchThreadID){
   // Get our 1Dimensional id for writing to our buffer
   int id1d = Id2dTo1d(id.xy, SPRING_COUNT);

   float springHeight = springPositionsArray[id1d];
   float velocity = spring1DVelocityArray[id1d];
   float acceleration = 0;

   int minX = (int)id.x - 1;
   int minY = (int)id.y - 1;
   int maxX = (int)id.x + 1;
   int maxY = (int)id.y + 1;

   for (int x = minX; x <= maxX; x++){
       for (int y = minY; y <= maxY; y++){
           // Ignore self
           if (x == (int)id.x && y == (int)id.y){
               continue;
           }
           float nHeight = 0;
           float nVel = 0;

           // Skip out of range spring IDs
           if (x < 0
               || y < 0
               || x > SPRING_COUNT-1
               || y > SPRING_COUNT-1){
               continue;
           }
           else {
               int nId = Id2dTo1d(int2(x, y), SPRING_COUNT);
               nHeight = springPositionsArray[nId];
               nVel = spring1DVelocityArray[nId];
           }

           float dampingForce = (nVel - velocity) * damp;
           acceleration += ((nHeight - springHeight) * stiffness)
                           + dampingForce;
       }
   }
   spring1DVelocityArray[id1d] += acceleration * timeStep;

}
Each thread of the kernel is the processing of one spring. For each spring, I loop over it’s neighbours to get their height and velocity from the previous frame. I then compute a damping force based on the difference between our spring’s velocity and each of its neighbour’s.
This is then summed with the acceleration (height delta scaled by stiffness) between the current spring and all of its neighbours and finally the dampening applied to counter the acceleration.
If all of the neighbouring springs are higher then the spring itself, they will increase the acceleration on the current spring, and pull it up basically, if an equal number of neighbour springs are going up and down, the current spring will remain stationary.
My position kernel is really simple at this point (it gets more complex, and that’s been omitted for now). Here I apply this velocity to the spring’s position and apply external forces – more on this in a later post.
float velocity = spring1DVelocityArray[id1d];

velocity += exernalForce; // Scale by external forces...

springPositionsArray[id1d] = saturate(springPositionsArray[id1d]
                                      + velocity * timeStep);

// Normalise our values before packing into texture
float outPosPct = saturate(springPositionsArray[id1d]);

// Pack into texture
springOutTex[id.xy] = outPosPct;
Both the position and velocity Kernels are called separately, as each kernel needs to read from one buffer, then write to another, and it’s not a good idea to read from, and write to the same buffer in the same kernel, thins get a little, weird.
I touched on this before, but this is down to the async nature of GPU processing. If you’re having a Kernel read and write to the same buffer at the same time, each thread has no way of knowing if it’s reading one of it’s neighbours after it’s been updated, or before. This means the integrity of the simulation breaks down very quickly, as seen below.

There’s another facet of the above gif, the debug I’d implemented poorly at the time is what’s causing the “growing” you’re seeing, but the breakdown into noise is an example of the problem I’ve just described. The simulation has stopped making sense.
I’ve now got a good basis for the foundation of my bowl effect, so next time I’ll be looking at combining the output of the surface sim, with the water-surface shader using HDRP and shader graph.